 |
| |
|
|
| |
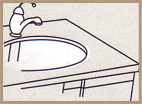
| INSTALLATION OF LAVATORY |
| Please Note: Please install it in a way that future removal from underneath the counter top is possible without damaging the counter top. |
| 1. |
Please check the desired location for clearance between the back splash, faucet, fixture and cabinet. |
| 2. |
Please cut the template. |
| 3. |
Please carefully trace the template on the counter top as directed. |
| 4. |
Please mark the faucet hole centerline on the counter top. |
| 5. |
Please drill a 1/2" pilot hole on the inside of the cut line. |
|
|
|
|
|
|
 |
|
|
| |
| For Wood Counter Tops: |
 |
| 1. |
Mark and per-drill the wood screw holes at the locations shown on the template. |
| 2. |
Waterproof any exposed areas of wood. |
|
|
|
|
|
|
|
|
| |
| For Marble Counter tops: |
 |
| 1. |
Position the counter top upside down on foam padding to protect the surface. Mark and drill 3/6" holes 5/8" deep atthe locations shown on the template. |
| 2. |
Use a setting tool and hammer to secure the anchors. |
| 3. |
Check the waste area and supply tubing if required. |
| 4. |
Do not open the lavatory from its protective carton untill you are ready for installation. |
| 5. |
Please follow all local building and plumbing codes. |
|
|
|
|
|
|
|
|
| |
| For All Installations: |
 |
| 1. |
If the counter top has not been installed, install it at this time. |
| 2. |
Drill the faucet holes according to the faucet installation instructions. |
| 3. |
Install the faucet to the counter top according to the manufacture's instructions. |
| 4. |
Install the drain to the lavatory according to the manufacture's instructions. |
|
|
|
|
|
|
|
|